How to Make a DIY Chalkboard Dresser for Kids
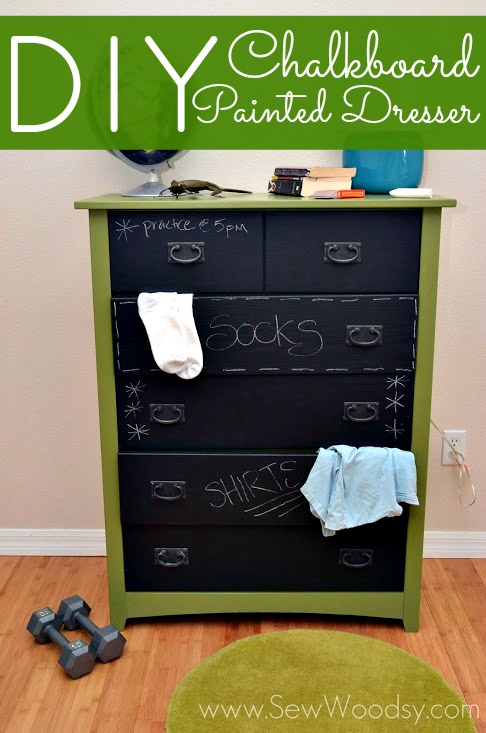
Take an old dresser from boring to brilliant with an easy chalkboard paint makeover! In a kid’s room, this project is not only fun, it’s also super practical. Help kids organize by labeling drawers (you can even draw pictures for kids too young to read)! For older kids, they can doodle on the dresser and change the look and feel of it whenever the inspiration strikes. We love the endless possibilities! Here’s how to make a DIY chalkboard dresser for kids.
Supplies Needed:
- Dresser
- Extra-fine Sandpaper
- Paintbrush
- Drop Cloth
- Lullaby Paints Chalkboard Paint
- Lullaby Paints Non-Toxic** Primer
- Chalk
- Towel
**Conforms to ASTMD-4236, specifically concerning oral toxicity, skin irritation and respiratory effects.
Step 1: Lay down a drop cloth to protect the surrounding area.
Step 2: Remove all hardware and drawers.
Step 3: Lightly sand down all dresser surfaces to smooth out any wear and tear and prepare the surface to adhere to the new finish.
Step 4: Clean off the dust.
Step 5: If any bare wood is exposed, apply a coat of primer and let it fully dry.
Step 6: Paint a layer of chalkboard paint onto the body of the dresser and drawer surfaces. We recommend using Lullaby Paints Chalkboard Paint. It’s non-toxic** – plus we have beautiful colors to choose from (and we can color match to any hue you choose)! Best results are achieved with two coats. Allow six hours between coats.
Step 7: Once the chalkboard paint has dried, take a large piece of chalk and place it on its side. Rub the entire chalkboard surface with the chalk.
Step 8: Wipe off the chalk with a towel. This allows for future chalk to be fully erasable and not get “burned” into the surface.
Step 9: Have fun!
**Conforms to ASTMD-4236, specifically concerning oral toxicity, skin irritation and respiratory effects.
Check out some of our favorite inspiration!
Source: Embrace My Space
Source: Sew Woodsy
Feeling inspired? Order some Lullaby Paints Chalkboard Paint today!


